Althea Korea is an online shopping website that sells authentic Korean products from different brands. I heard and read about them a couple of times before but I never really … Continue reading My 1st Althea Haul + Mini Product Reviews

Althea Korea is an online shopping website that sells authentic Korean products from different brands. I heard and read about them a couple of times before but I never really … Continue reading My 1st Althea Haul + Mini Product Reviews

Waterproof makeups are my jam. It is a must for me because I have oily combination skin and I also live in a humid country (even if I am from … Continue reading Yaayyy or Naaayy! Maybelline Micellar Water

So last year (around October or November), Nature Essentials launched a brush set which is a collaboration with Filipino Make up Guru and Youtuber Say Tioco Artillero. It’s an 11 … Continue reading Yaaayy!! or Naaayy!! SayTioco Bamboo Brush Set x Nature Essentials

Halloween is just around the corner. Though in the Philippines, trick or treats and costume celebration is not really a thing, it’s still nice to play around and scare the … Continue reading Rocky Horror Picture Show Inspired Makeup
Ok let’s try doing this. Hahaha
This month, I have been loving products specifically in the make-up department.
Here are those 5 products

First, The Body Shop Lip Butter in Strawberry


This has been with me for about a year now. And I just rediscovered it this month. My lips have been very dry due to the cold and fluctuating weather of Baguio. This Lip Butter has helped me a lot in that area. It also has this strawberry sweet scent and taste which I like so much.
Next, LA Pro Conceal HD in Creamy Beige
I am joining the hype for this concealer. Hahaha. Because, it is worth the hype. It has a thick yet creamy consistency. I use this as a highlighter under my eyes, the bridge of my nose, center of my forehead, cupid’s bow and chin. It hides the darkness under my eyes and it stays put all day. I do not use this to conceal pimples and pimple marks because it is too light for my skin. To blend this out, I use my damp egg sponge.
LA Lip Paints in Elude

Another LA Girl product here. Actually, I bought both products from LoveManila. I was at first planning to buy whisper but they were out-of-stock. So I just purchased elude because I really want to try their lip paints and because I need a quite nude lip color. Even if this is not what I really wanted, I fell in love with it since the first application because of its mintiness. It’s a beautiful pinkish nude lip color perfect for everyday. I use it alone, on top of a lip liner or even on top of a pink lipstick. To apply it, I use my fingers or my lip brush. It’s a little messy though.
Benefit They’re Real Mascara


I love Mascaras. If I’m not feeling on putting a lot of make-up, I just pop on some powder foundation, lipgloss, brows and Mascara. I’m good to go. This Mascara is legit when it comes to lengthening. I have a not so visible lashes and this helps a lot. It makes me look awake when I use it.
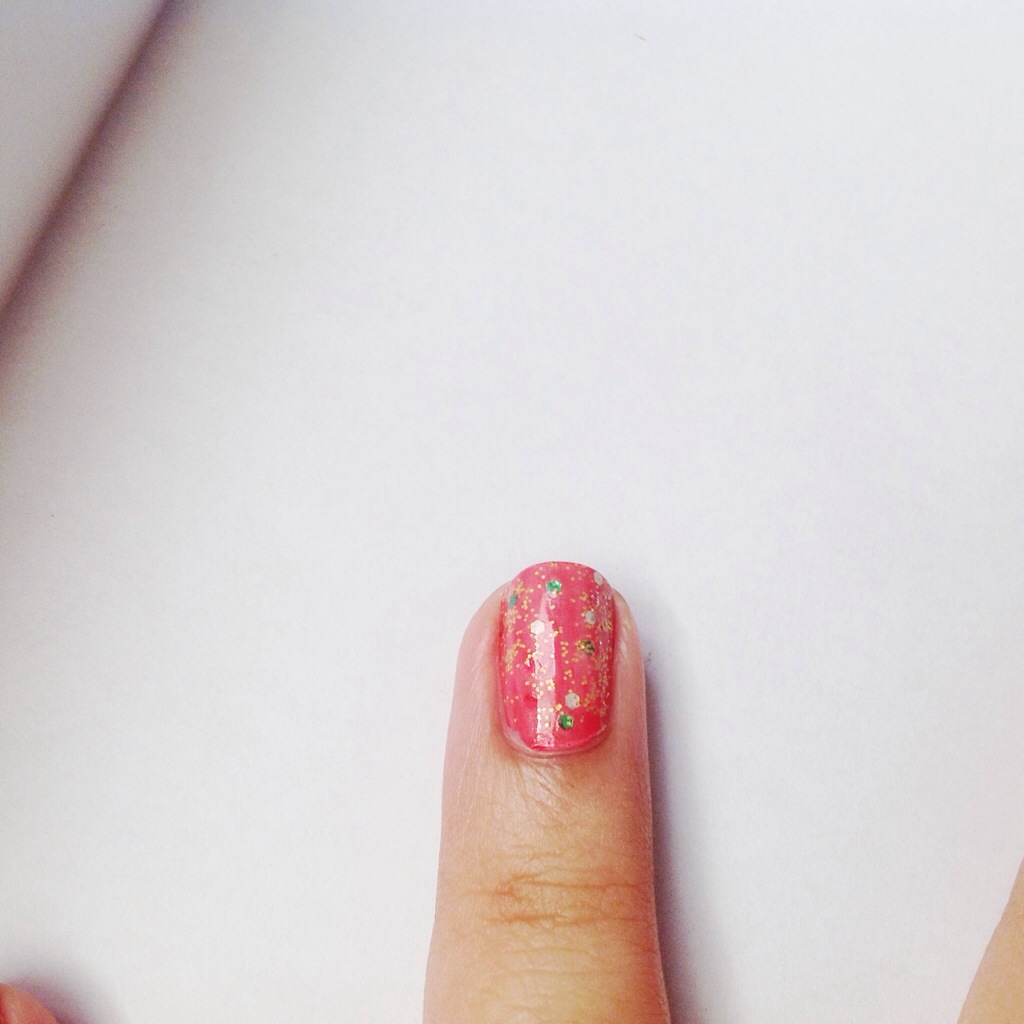
Lastly, ok this is not make-up but it’s for the nails
San-San Nail Polish in Touch of Beige
I’m not a fan of nude colored nail polishes. I don’t know why. But since I bought this, it’s been on my nails ever since. It’s like the LA lip paint. It’s a nude pink color and it somehow last on my nails. I have used this on my nails on my valentines day inspired nail art.
Here it was.

That’s my favorites this month. So what’s yours? I want to know so that I can try them out also. Have a nice day. Have a Beautiful and Blessed March guys!!
Follow me and be updated:
Instagram: joannavillareal
Twitter: ohitsjoannaV
Visit my VSCO Grid:
joannavillareal.vsco.co
Any inquiries? E-mail me at
joanna_villareal24@yahoo.com
October is known as the Breast Cancer Awareness Month. And for my latest nail art, I used Breast Cancer Awareness as my inspiration.
The outcome

My nails with my Cherry Berry drink
💗
Channeling the pink vibe. 🙂
I’ve used Bobbie’s Fame Bikini polish for the pink base of my nails. It has this cute pastel/baby pink color which I am loving as of the moment. The sad part of this polish is that I have to use 4 coats for it to get it opaque.
I did a white stipe with a zebra like pattern in the middle of my nails on my middle finger and thumb.
I also used Etude’s glitter polish for my pinky finger to add a little sparkle.
I really love how my nails turned out. It’s a great way to raise awareness by doing to it through your passion.
Today I venture to the world of make up. I recently purchased some items from Etude House and one of them is this double eyelid tape. I bought this out of curiosity and because I only needed a few more pesos to get their pink card. Hahahahaha

One pack contains 50 pairs of the tape and cost 58 pesos.

Here is a closer look at the tapes.
How I apply it:
Etude is a Korean Brand so the instructions at the back of the packaging was in Korean. So I just have to figure it out along the way. It took me 3 tries to figure this thing out. Hahaha. Anyway, this is how I did it.
1. Use a tweezer

2. Locate where you want to place the tape. In my case, I placed the straight side of the tape exactly on the fold of my lids.
3. Slowly place the tape on your lids and gently push it in so that it would stick properly.

Lids without double eyelid tape

Lids with double eyelid tape

Closer look

P.S. Sorry for my tired looking eyes. Hahaha
Thoughts about the product:
As you can see, it does give me a more visible lid (perfect for people who have mono and hooded lids). Plus it does stay on for a long period of time. I even had a hard time removing it. What I didn’t like about it is that it is very visible. Everyone can see the tape especially when you close your eyes. I tried putting on make up over and even under it but it didn’t hide the tape at all. I think this tape is better looking on women who have fair/pale skin. Also, as a quite sensitive person, I can feel the tape on my lids and it’s a little irritating.
For me, I wouldn’t be repurchasing this product. I have a lot more left and I am sure I wouldn’t be using this everyday or I might not even go out wearing this because it’s just too visible for me. I might just use it when I want to play with my lids. 🙂
SUMMER is over here in the Philippines. I know that in some other parts of the world, summer is just beginning. Despite the rainy season kicking in, I am still obsessed with summer’s bright vibrant colors. So here is a summer inspired nail art.

So I’ve used my red-orange nail polish for my pinky and ring finger.

Besides the red-orange polish, I also placed the chunky glitters on my ring finger and topped it of with that sheer glazed polish to make the glitters a little subtle.
Le ring finger 🙂
For the three fingers, I made it colorful.

I’ve used 2 coats of this white polish as my base color. This will make the other colors pop.

For that colorful summer feel, I’ve chosen these nail polishes.
What I did was I removed some of the nail polish on the brush by wiping it off on a paper until almost all of the nail polish are gone just like this

Then I piled the different colors on my nails. After that, I just placed a topcoat to blend the colors. Added studs, and they’re all done 🙂

Easy simple colorful nails that shouts SUMMER!! Hope you enjoy the summer heat 🙂
Hooraayyy!! Internet’s back 🙂
How are you all doing? I’m so happy because I just realize that my blog had its anniversary last June 1st 🙂
Moving on… I have been obsessing on the color TEAL lately (but purple is still my favorite color). How obsessed am I? My wallpaper on bakery town, the game on app store, is teal colored xD. And I am so happy that in my nail polish collection, I have a Teal color nail polish. Not one, but two bottles which was from a nail polish set my sister gave me last year. So after 2 weeks, I’ve decided to paint my nails again.
So this are the nail polishes I have used.


As you can see, i have used the silver nail polish and the silver glitter polish on my ring finger. It served as my accent nail. And the teal I’ve placed on the rest of my fingers.
If you know me, or have been following my blog, I really never settled on plain nails. So I’ve decided to put simple designs on my nails.
I’ve used the white polish to put dots and a curved line on my middle and pointy finger. I’ve also used it to place a triangle on my thumb. And of course, I have used my Sally Hansen I ❤️ nail art studs kit.
This is what I came up with..

I hope you guys like it. 🙂
Follow me on
instagram: joannavillareal
Twitter: ohitsjoannaV
Have a great day 😀
Look at what I bought..

Sally Hansen’s I ❤️ nailart studs kit.
I’ve been looking for nail studs for how many months now. Finally, found one. And this was the last one. I guess it was really meant for me. Hahahaha XD.

The kit has 3 kinds of studs and an applicator. Looking at it, I think it will take me years to use them all. Hahaha. For Php 315.00, this is highly worth it.

Closer look on the studs.
I have already used the studs on my nails. They are easy to apply. I didn’t used the applicator because I found it easier to used my fingers in placing them on my nail.

Used the white and the black studs. Excited to do more nail arts with these studs. ❤️💅
